How to Make Decorative Tile Coasters!
Designer Tile Coasters w/ Decorative Ribbon make Great Gifts
4 - 4 1/8 inch squares of coordinating scrapbook paper
Mod Podge
Paint (optional)
4 - 4 1/8 inch squares of felt
Ribbon
Krylon UV Resistant Clear Acrylic Spray Coating
First the clean top of tile and let it dry completely.
Cut squares of scrapbook paper (I like the paper to coordinate, but you might like all of the coasters the same or completely different, your choice). I highly recommend a paper cutter like the one above.
The scrapbook paper should be slightly smaller than the tile because air will get under the paper when it is too close to the edge.
You can paint the sides of the tile, (optional) with a sponge brush. Make sure to wipe the paint off the top of the tile if it gets on there. I don't paint the sides of my tiles, but it's your preference. Let it dry.
Put a layer of Mod Podge on the front of tile and the back of the scrapbook paper. Then put the paper on the front of tile. Push any air bubbles from the middle of the tile to the edges of the tile. There is actually a tool to push out the air, but you can use cardboard or something you might have around your house. Don't scrape too hard or it will mess up the scrapbook paper. Let dry for 15 minutes and apply another coat of Mod Podge on top of the tile. Repeat this process about 3 times.
Let dry overnight and (take it outside...do not spray in your house) then spray Krylon UV-Resistant Clear spray over the entire top of tile. Let dry for 30 minutes and repeat 2 times.
Cut a felt sqaures for the back of the coasters so it doesn't scratch your furniture and glue it to the back. I also use my cutter for the felt too. It cuts a much straighter line than I could ever cut.
I showed you 2 different ways to do the felt on the back.
Tie a decorative ribbon around the coasters and give as a gift. It's cheap and easy.
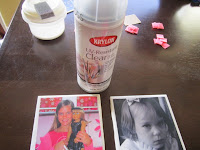
NOTE: if you make a personalized photo tile coaster, you CAN'T put Mod Podge on the front of the photo (it turns it pink). You should put Mod Podge on the tile and the back of the photo, but NOT on the front of the photo. Let it dry. You would skip the step where you put Mod Podge on the front of the photo and go to the step where you spray the UV- Resistant Clear on the photo photo on a light sweeping motion. Spray another coat of the UV-Resistant Clear and let dry. It's done.


